Getting Started
Quick start guide
Get from zero to your first live competition or deal in five steps.
1
Create your vendor account
Sign up at heycomps.com/shopify/login using your email address. Verify your email to activate your account.
2
Connect your Shopify store
Go to Settings → Shopify connection and install the HeyComps app on your Shopify store. This lets HeyComps sync your products and generate discount codes automatically.
Full guide →
3
Choose a plan
Starter ($25/month or $249/year), Pro ($49/month or $499/year), or Elite ($129/month or $1299/year) — all come with a 14-day free trial and are billed via Shopify App Billing. No charge until day 15.
Plan details →
4
Build your first competition or deal
Go to the Competition Builder or Deal Builder, fill in the details, choose your branding, and click Publish. Your competition or deal is live immediately.
5
Add it to your Shopify store
On your My Competitions or My Deals page, click 🛍️ Create Shopify Page, then follow the short one-time theme setup guide to build a real, branded page for it on your store.
Full Shopify setup guide →
Getting Started
Connect your Shopify store
HeyComps connects directly to your Shopify store to sync products, generate discount codes, and create fulfilment orders automatically.
1
Go to Settings
From your vendor dashboard, click Settings in the left sidebar. Find the Shopify connection section.
2
Install the HeyComps Shopify app
Click Connect Shopify store and enter your Shopify store domain (e.g.
your-store.myshopify.com). You'll be redirected to Shopify to approve the app installation.3
Approve permissions
HeyComps requires access to products, inventory, orders, and price rules. These permissions allow automatic stock reservation, discount code creation, and prize fulfilment orders.
4
Sync your products
Your first sync happens automatically the moment you connect. After that, go to Products and click ↻ Sync now whenever you've added or changed products in Shopify — sync is currently manual, not automatic on an ongoing basis. Products need stock > 0 to be available as competition prizes.
💡 Troubleshooting
If your sync fails: check your store is active and not password-protected. Try disconnecting and reconnecting the app. If products still don't appear, contact HeyComps support.
Getting Started
Plans & billing
HeyComps for Shopify has three plans — all billed through Shopify App Billing. Charges appear on your regular Shopify invoice, no credit card form needed. Every plan includes a 14-day free trial. Available to all Shopify stores globally.
⭐
Starter Plan — $25/month or $249/year
Up to 5 simultaneous competitions, 500 entries per billing cycle, and unlimited deals. Includes a 14-day free trial — no charge until day 15. Available to all Shopify stores globally. Billed via Shopify App Billing.
🚀
Pro Plan — $49/month or $499/year Most popular
Unlimited simultaneous competitions, up to 10,000 entries per billing cycle, and unlimited deals. Includes a 14-day free trial — no charge until day 15. Cancel before day 15 and pay nothing. Available to all Shopify stores globally.
💎
Elite Plan — $129/month or $1299/year
Unlimited simultaneous competitions, up to 50,000 entries per billing cycle, and unlimited deals. Includes a 14-day free trial — no charge until day 15. Available to all Shopify stores globally.
✅ Included on every plan
Shopify product sync · Automated winner selection · Manual Prize option with full currency selection · Winner address collection · Unique discount codes for all entrants, claimed instantly on entry · Unlimited deals & email-gated reveals · Embed branding (theme, accent colour, font) · Bonus entry tasks & video links · Entrant email list & CSV export · Analytics & view tracking · No commission, ever · Cancel anytime
Starter: Up to 5 live competitions · 500 entries per cycle | Pro: Unlimited competitions · 10,000 entries per cycle | Elite: Unlimited competitions · 50,000 entries per cycle
Starter: Up to 5 live competitions · 500 entries per cycle | Pro: Unlimited competitions · 10,000 entries per cycle | Elite: Unlimited competitions · 50,000 entries per cycle
Competitions
Build a competition
The Competition Builder walks you through every step. Go to My Competitions → + New competition to get started.
1
Choose prize delivery method
At the top of the builder, choose 🏪 Shopify Product (prize fulfilment handled automatically via Shopify) or 🎁 Manual Prize (you fulfil the prize yourself — ideal for experiences, gift cards, or prizes outside your Shopify range).
Prize delivery guide →
2
Select your prize and currency
If using Shopify delivery: search and select one product (or bundle multiple) — the prize value and currency are taken directly from the product price(s), always in your store's own currency. If using Manual Prize: enter the value yourself and choose a currency from the dropdown, which defaults to your Store Profile default (or your store's own currency if you haven't set one) — you can still pick a different currency for this specific competition.
3
Add competition details
Give your competition a clear title and description. Upload a banner image (16:7 ratio recommended, max 2MB, JPG/PNG/WEBP) — this appears as the hero image on the competition card and listing page.
4
Set dates and entry limit
Set a start date, end date, and optional maximum entry count. Competitions close automatically at midnight on the end date. The winner is selected automatically when the competition closes.
5
Set the entry location
Choose who can enter: Worldwide, a specific country, or a custom restriction. The embed validates the winner's submitted country against your chosen restriction.
Location guide →
6
Add bonus entry tasks and a video (optional)
Give entrants extra ways to boost their entry weight — e.g. following a social account or visiting a link. You can also paste a video URL to show a product demo or prize showcase directly on the competition page.
7
Configure non-winner discount codes
Toggle discount codes on or off. If on: set the percentage (e.g. 20%), choose whether codes expire after a set number of weeks or never expire. A pool of unique, single-use codes is generated the moment you publish, and each entrant claims one instantly the moment they enter — there's no delay, and nothing is ever emailed to entrants.
8
Set entry requirements & T&Cs
Entry requires an email address. You can also require name and a marketing opt-in checkbox. Add your competition terms and conditions — these appear in the T&Cs dropdown on the embed and listing page, alongside HeyComps' own T&Cs.
9
Set embed branding
Choose Light or Dark theme, pick an accent colour (drives the Enter button and highlights), and select a font — or leave these on your Store Profile defaults. A live embed preview shows exactly how it will look on your Shopify store.
Branding guide →
10
Publish
Click 🚀 Publish competition. Your competition goes live immediately — there's no review or waiting period. You'll see a confetti celebration and be redirected to My Competitions, where your new competition card is ready for the next step.
11
Create your Shopify page
On the competition's card in My Competitions, click 🛍️ Create Shopify Page — this creates a blank page on your Shopify store. You'll then build a quick one-time theme template to display the competition on it — see the full walkthrough below.
Full Shopify setup guide →
Competitions
Add a competition to your Shopify store
A one-time, ~90 second process per competition. Once you've built the page and its theme template, your competition is live on a real, shareable page that matches your store's branding.
⚠️ Do not delete your store's Header or Footer content at any point. Always build a brand new template for each competition — never add the HeyComps block directly to your Default page template, since that's shared across every page on your site that doesn't have its own template.
A1
Create the page
In My Competitions, click 🛍️ Create Shopify Page, confirm or edit the page's URL when prompted, and continue. HeyComps creates a blank page in your Shopify store automatically.
A2
Open the Theme Editor
Click ✏️ Create Competition Shopify Theme Template. This opens your Shopify Theme Editor in a new tab.
A3
Create a new template
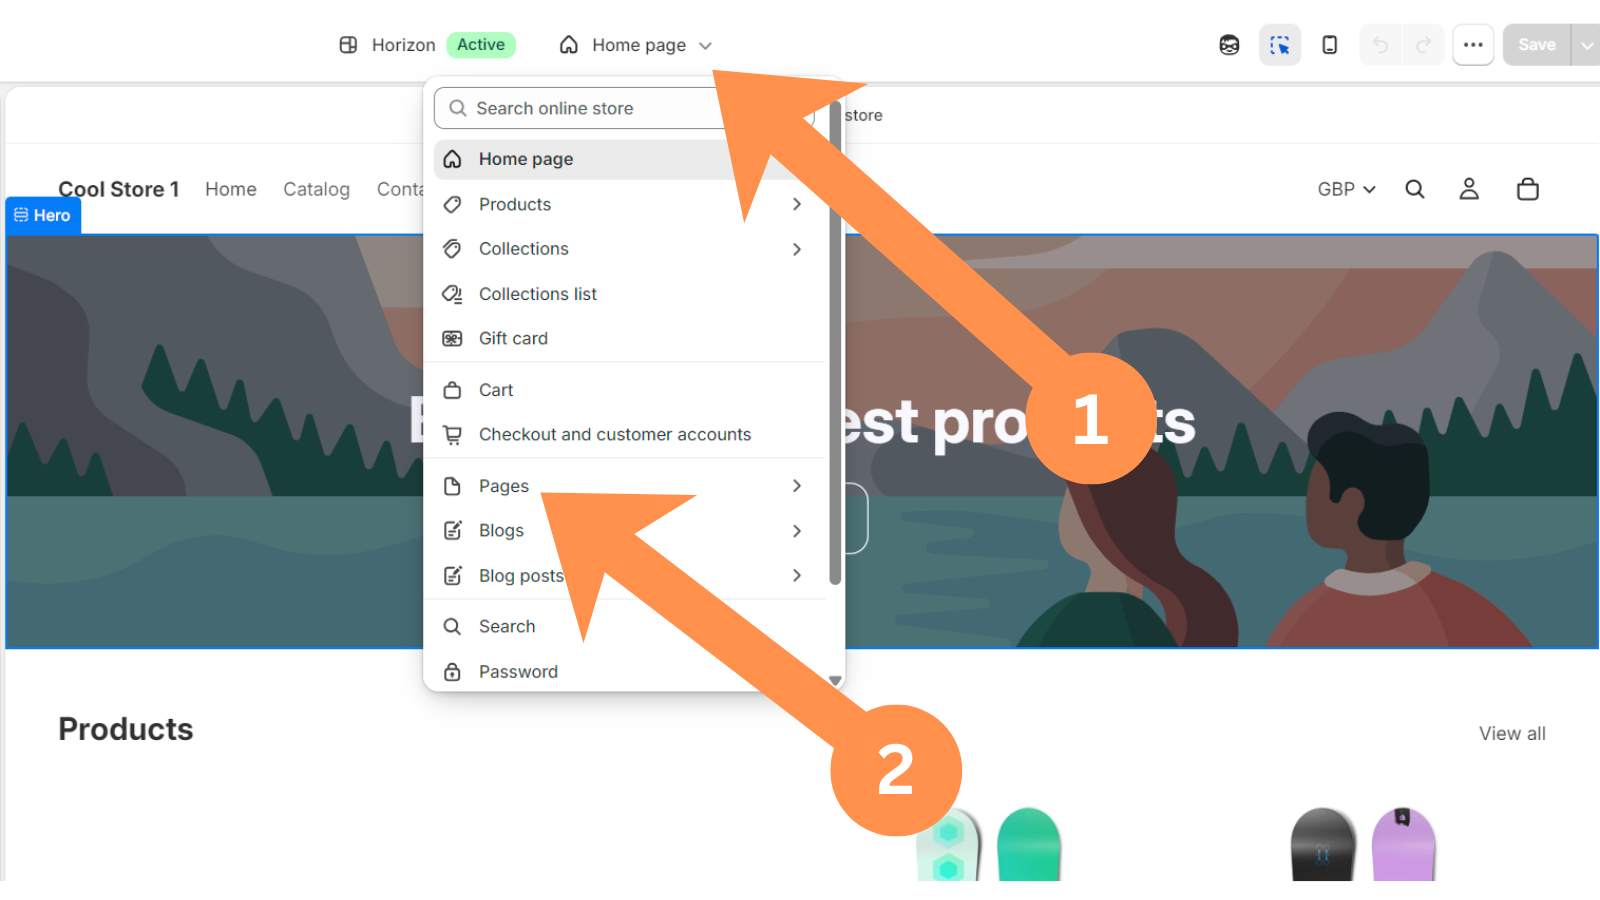
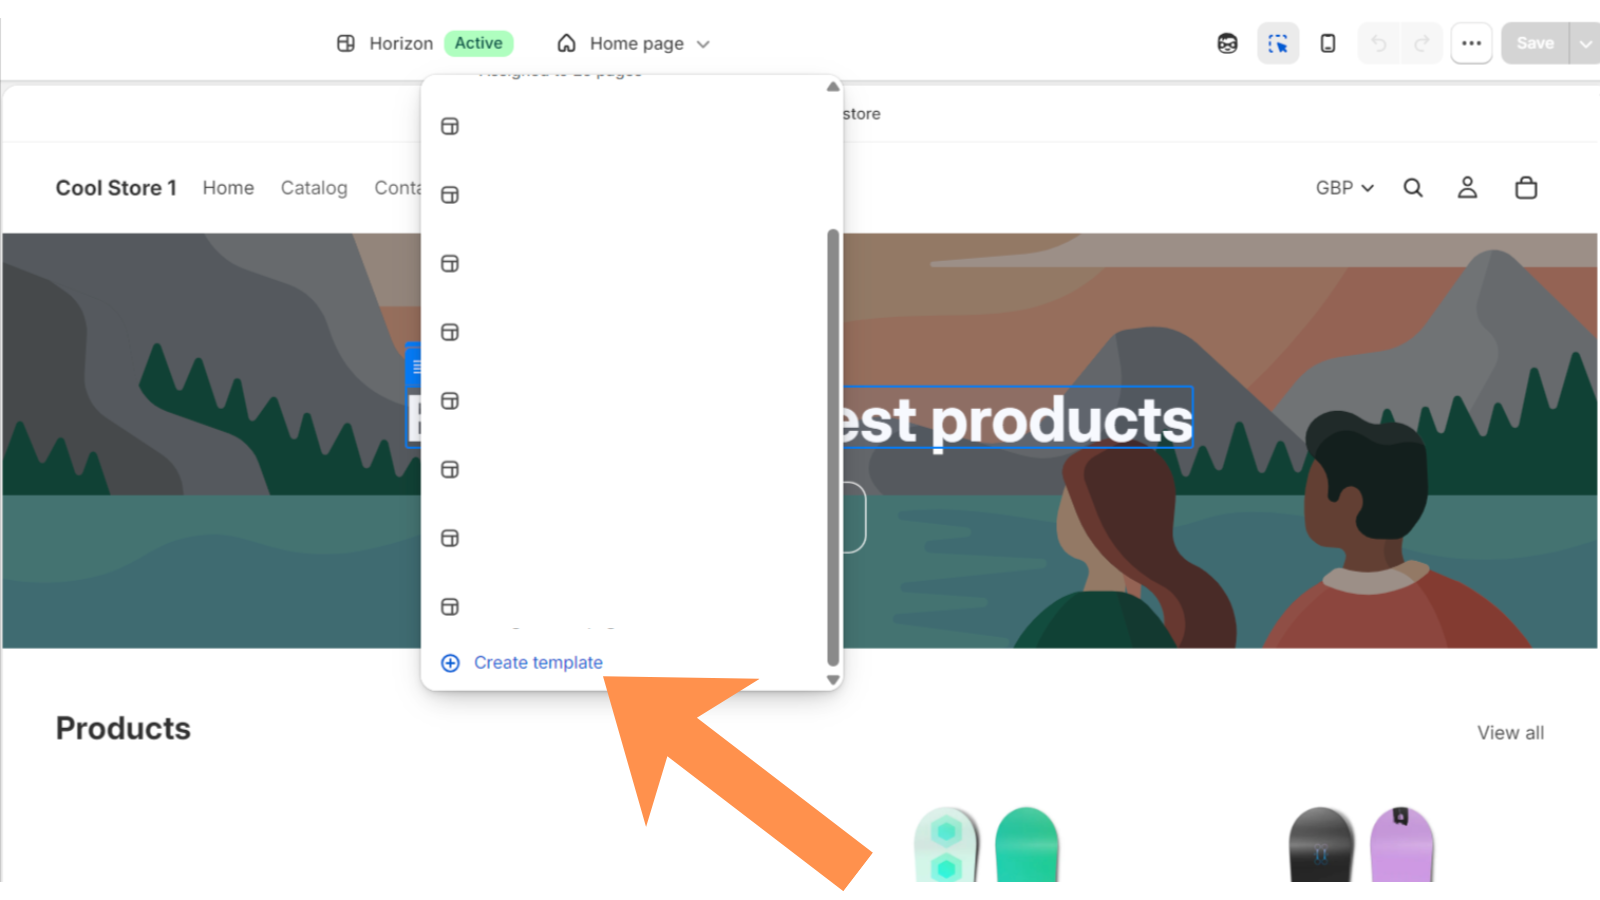
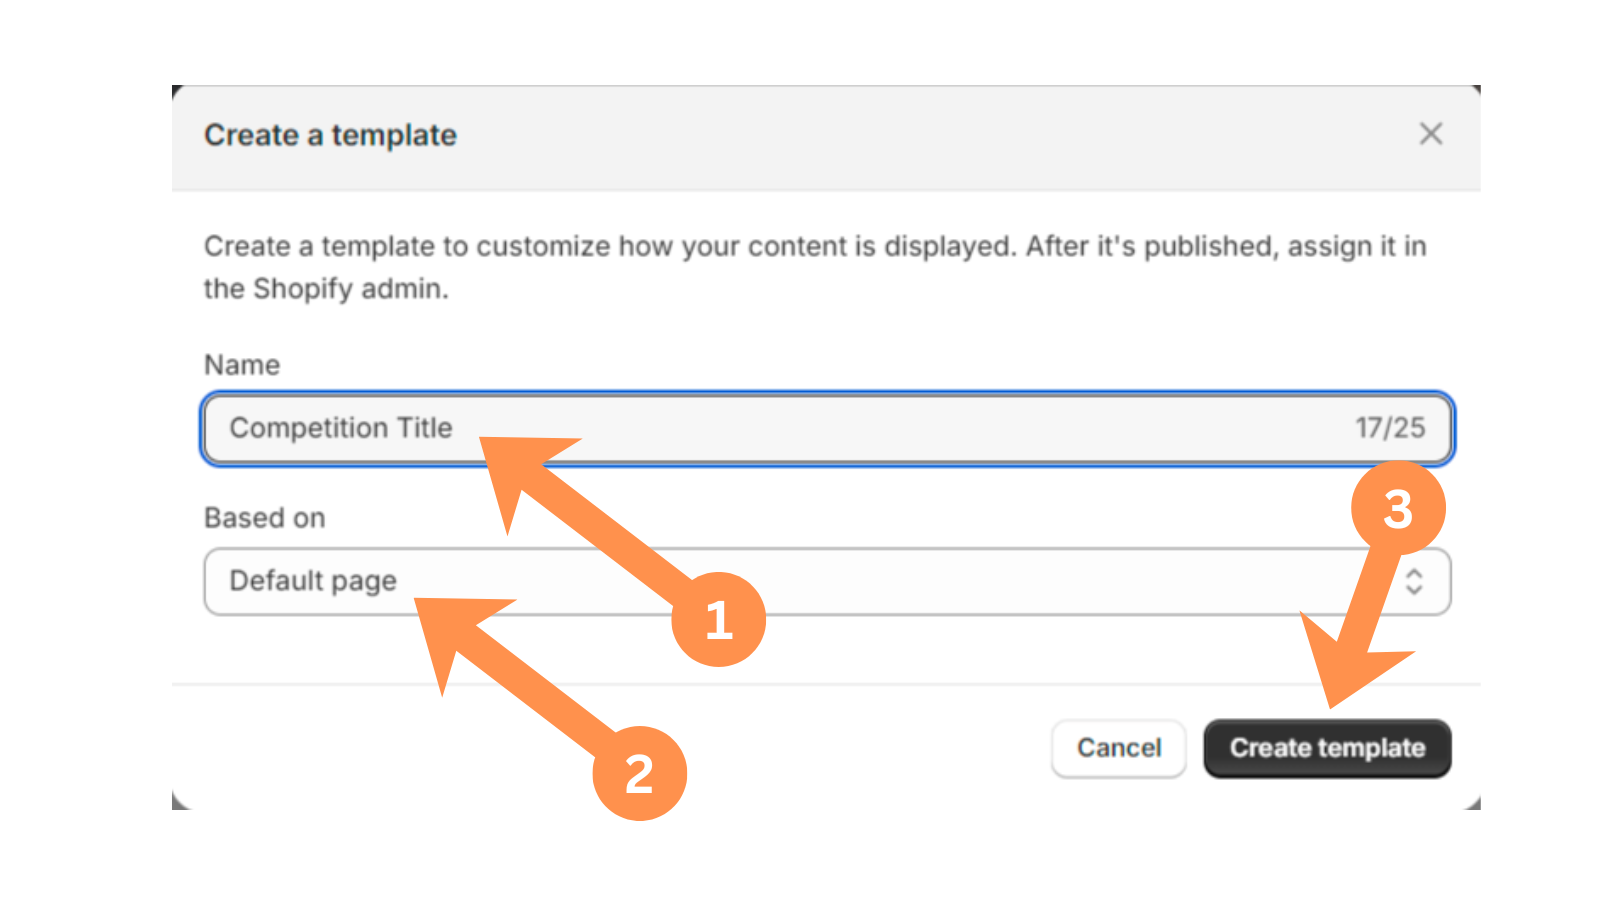
At the top center of the screen, click the template dropdown, select Pages, scroll down and click + Create template. Name it (using the competition's name is a good way to keep track of it), and under Based on, choose Default page.
A4
Clear the inherited content
You'll see existing content already in the template — this is normal, every new template starts as a copy of an existing one. Delete this content, but leave the Header and Footer sections completely alone.
A5
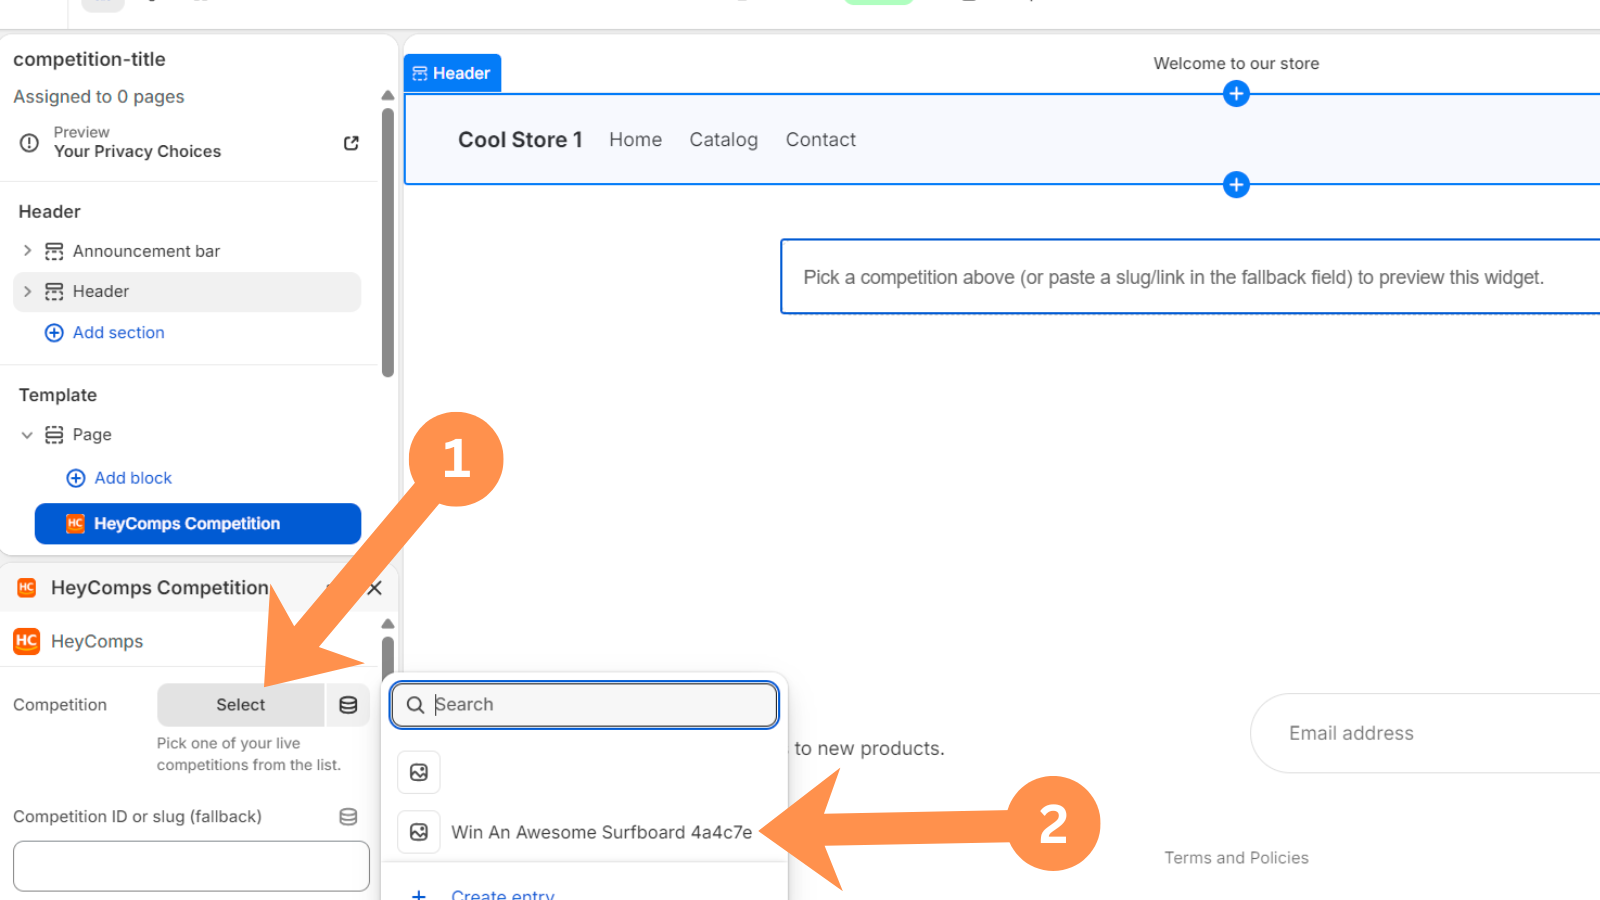
Add the HeyComps block
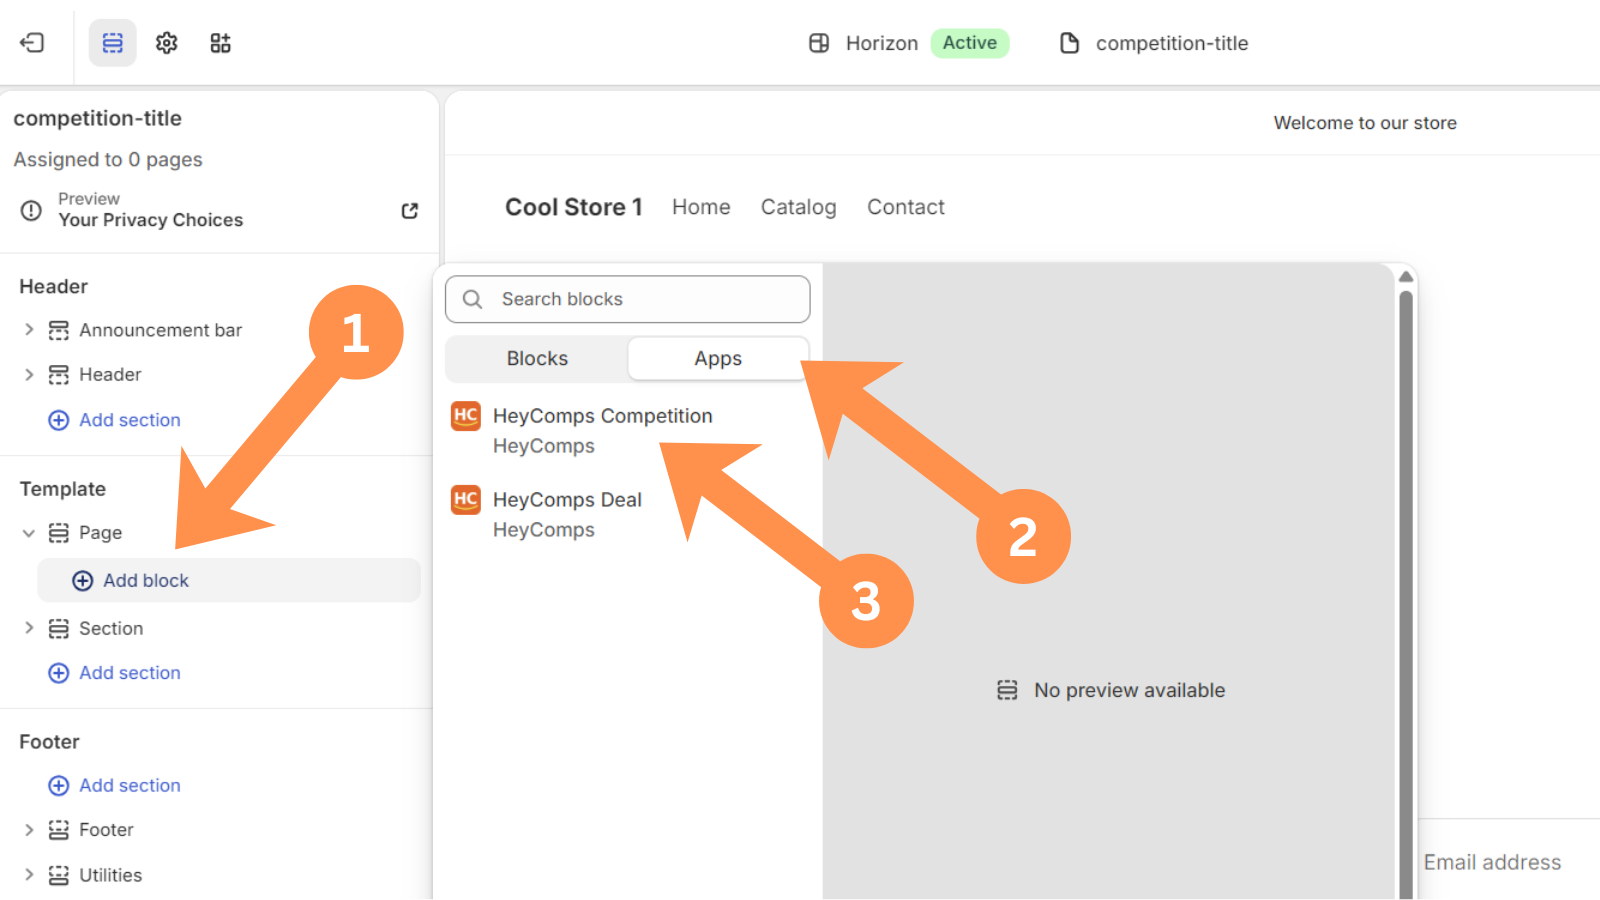
In the left menu, under Template → Page, click Add block → Apps → HeyComps Competition.
A6
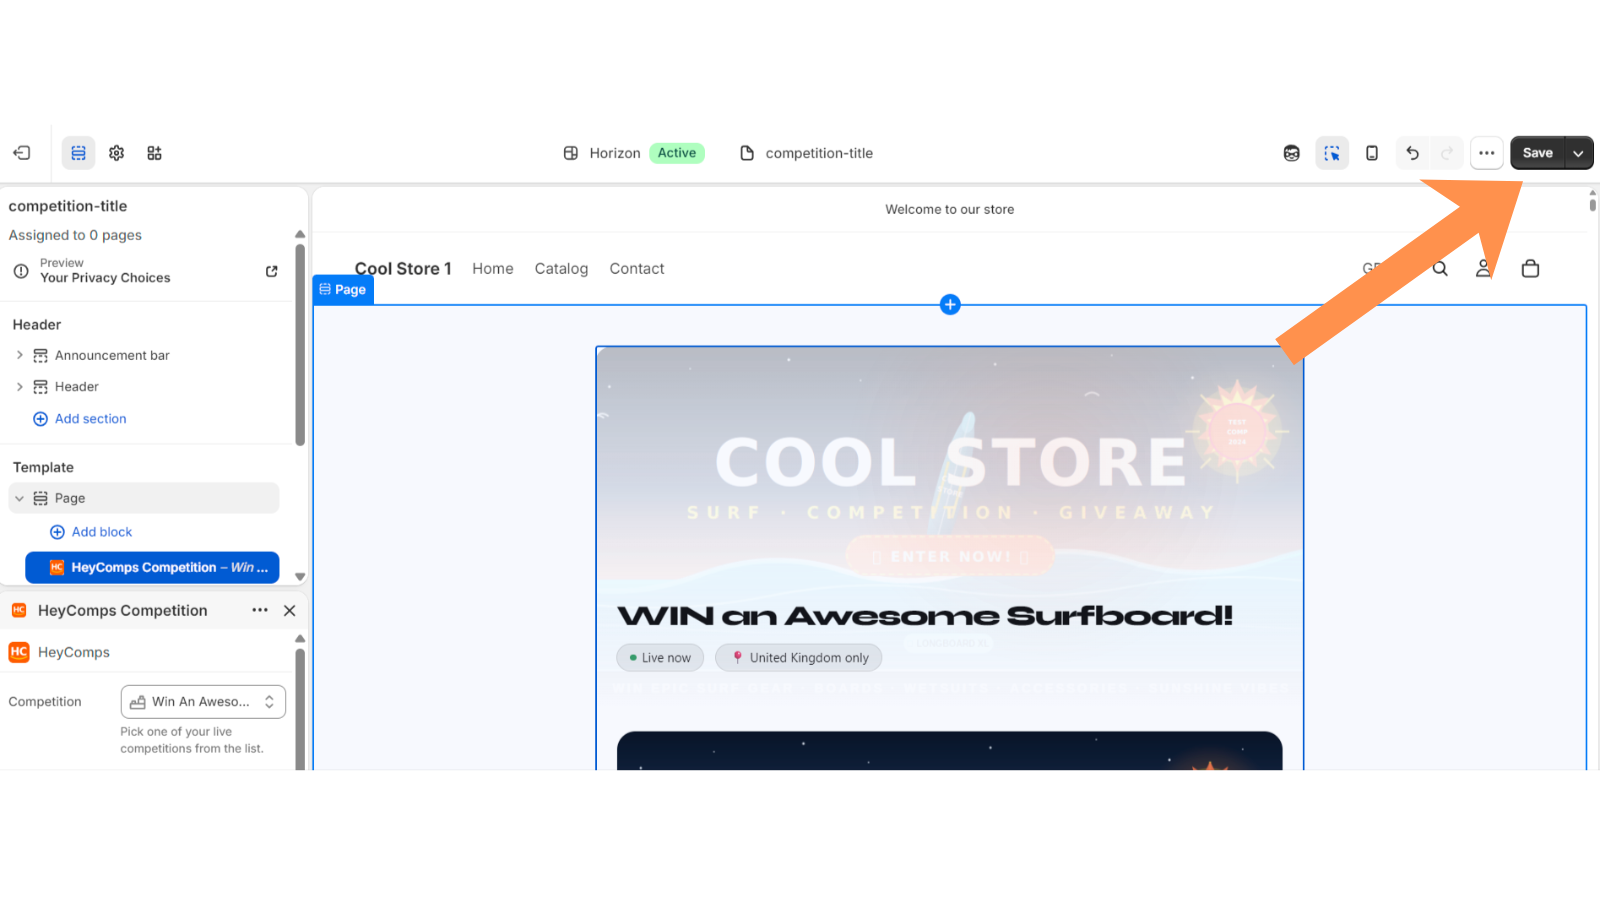
Pick your competition and save
Click the new block, use the Competition dropdown to select this specific competition, then click Save.
A7
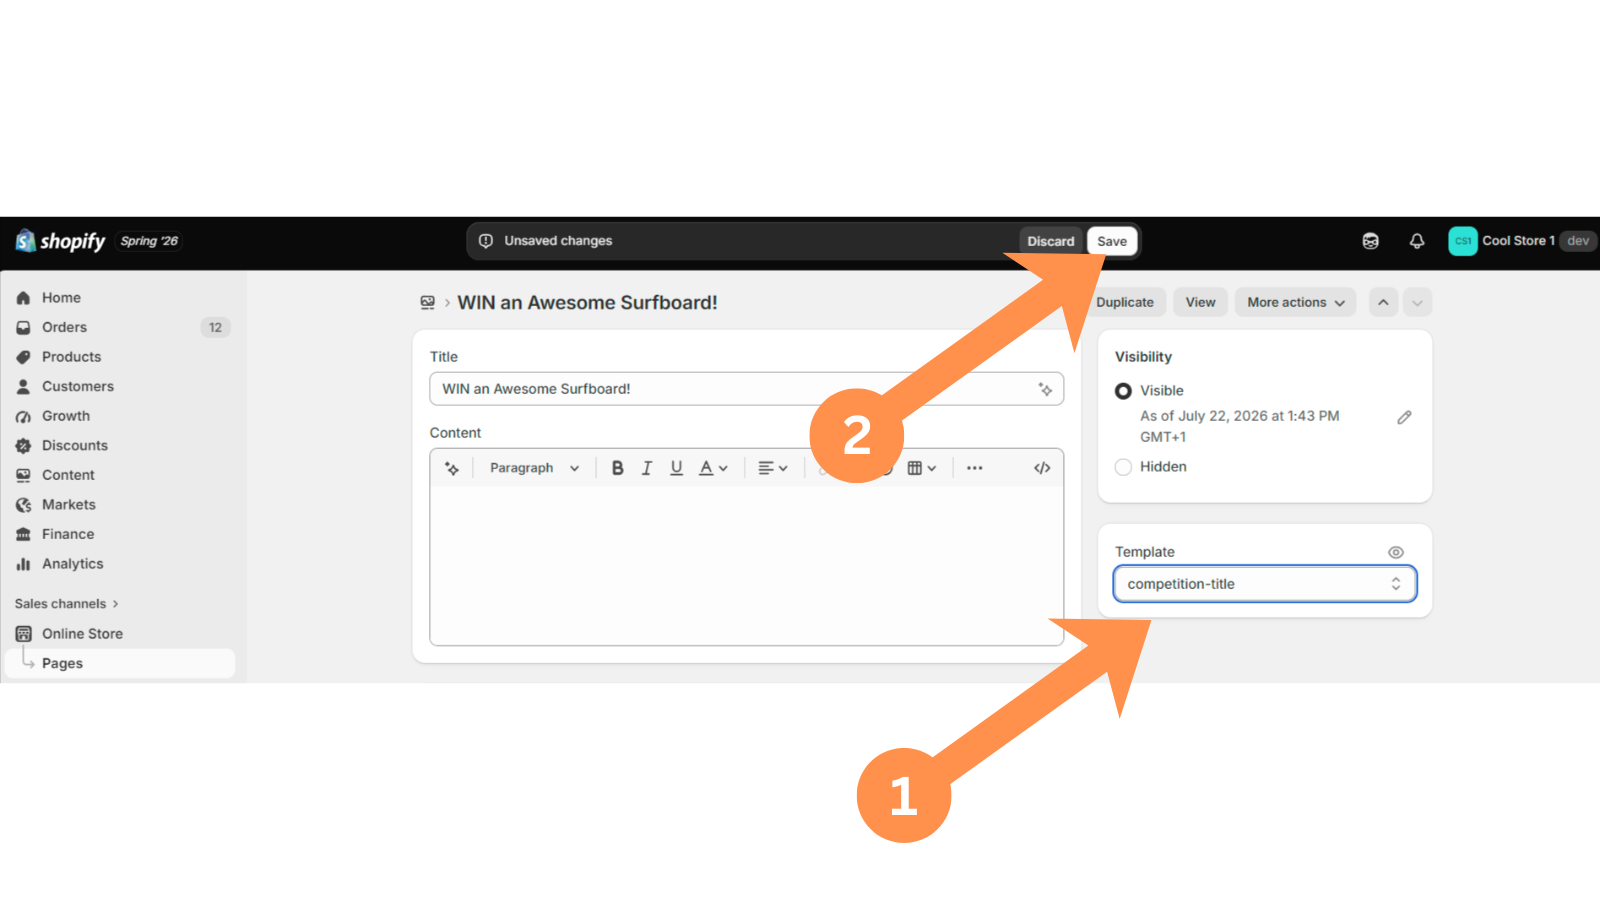
Connect the template to the page
Back in My Competitions, click 👁️ View Shopify Page. On that page, click the "..." menu next to Edit Theme, then click Edit Page. Find the Template dropdown on the right, select the template you just built, and click Save.
A8
Confirm it worked
View the live page. It may show just the title with blank space underneath for up to about a minute — this is normal Shopify caching, not an error. Confirm the widget displays full width, correctly branded, and shows the right competition.
Troubleshooting
| What you see | Fix |
|---|---|
| Content shows narrow/centered, not full width | Click the Page section in the sidebar → set Width to Full width |
| A different competition shows on every page | The block was added to Default page instead of your own template — repeat steps A3–A6 with your own dedicated template |
| Still blank after a few minutes | Contact support |
Competitions
Prize delivery: Shopify vs Manual
HeyComps supports two ways to deliver the prize when a winner is confirmed. You choose at the top of the Competition Builder.
🏪
Shopify Product
• Prize product selected from your Shopify store
• Inventory reserved automatically on publish
• When you approve the winner, a Shopify order is created automatically
• Fulfil the order in your Shopify Admin as normal
• Best for physical products already in your store
• Inventory reserved automatically on publish
• When you approve the winner, a Shopify order is created automatically
• Fulfil the order in your Shopify Admin as normal
• Best for physical products already in your store
🎁
Manual Prize
• No Shopify product needed
• Upload a banner showing the prize
• When you approve the winner, you fulfil the prize yourself
• No Shopify order is created
• Best for experiences, gift cards, holidays, or any prize outside your Shopify range
• Upload a banner showing the prize
• When you approve the winner, you fulfil the prize yourself
• No Shopify order is created
• Best for experiences, gift cards, holidays, or any prize outside your Shopify range
💡 Note
The winner address collection, vendor review, approve/reject flow, and re-roll logic work identically for both prize types. The only difference is what happens when you click Approve: Shopify creates an order automatically, or you fulfil the prize manually.
Competitions
Location & eligibility
Control who can enter your competition by setting an entry location. The winner's submitted delivery address is automatically validated against your chosen restriction.
Available location options
🌍 Worldwide (no restriction)
🇬🇧 United Kingdom only
🇺🇸 United States only
🇪🇸 Spain only
🇫🇷 France only
🇩🇪 Germany only
🇦🇺 Australia only
🇳🇿 New Zealand only
🇨🇦 Canada only
🇮🇪 Republic of Ireland only
🇮🇹 Italy only
🇸🇬 Singapore only
🇪🇺 European Union
✏️ Custom restriction (free text)
✅ Location match
When the winner submits their address, the embed validates their submitted country against your restriction. If it matches, you see a ✅ indicator in the winner review panel.
⚠️ Location mismatch
If the winner's country doesn't match, you'll see a ⚠️ warning. You can still approve if you wish, or reject with the reason "Address outside eligible region" to trigger an automatic re-roll.
✏️ Custom restriction
Choose "Custom" and enter your own restriction text (e.g. "London residents only" or "Europe excl. UK"). This is displayed to entrants but not automatically validated — you review the address manually.
Competitions
Branding & embedding
Make your competition match your Shopify store's look and feel. Set branding in the Competition Builder, then follow the Shopify setup guide to publish it.
1
Set your embed branding in the builder
In the Embed branding section at the bottom of the Competition Builder:
Theme: Light (white background, suits most Shopify stores) or Dark (HeyComps default dark look).
Accent colour: Use the colour picker or enter a hex code. This drives the Enter button, highlights, and progress bar. Quick preset swatches for common brand colours are available. Click Reset to restore HeyComps orange.
Font: System/Shopify native (recommended — inherits your store's font), DM Sans (HeyComps default), Inter, Poppins, or Nunito.
Theme: Light (white background, suits most Shopify stores) or Dark (HeyComps default dark look).
Accent colour: Use the colour picker or enter a hex code. This drives the Enter button, highlights, and progress bar. Quick preset swatches for common brand colours are available. Click Reset to restore HeyComps orange.
Font: System/Shopify native (recommended — inherits your store's font), DM Sans (HeyComps default), Inter, Poppins, or Nunito.
2
Preview the embed
The live embed preview in the builder shows exactly how the competition will appear on your Shopify store. Click ↺ Refresh after changing settings. The preview only activates for published competitions.
3
Publish it to your Shopify store
On your My Competitions page, click 🛍️ Create Shopify Page, then follow the theme setup guide to build a real, branded page for it.
Full Shopify setup guide →
💡 URL parameter overrides
You can override branding directly in the embed URL:
?theme=light&accent=3B82F6&font=inter. Available fonts: system, dmsans, inter, poppins, nunito.Competitions
Winner selection & flow
When a competition closes, HeyComps selects a winner automatically by cryptographically random draw. Here's what happens next.
1
Competition closes — winner selected automatically
At midnight on the end date, HeyComps runs a fully automated random draw from all eligible entries. A secure winner token is generated. You receive a notification email. The competition card on your My Competitions page updates to show the winner flow.
2
Add your Shopify competition page URL
On the competition card, enter the URL of the page on your Shopify store where the competition is embedded (e.g.
https://your-store.com/pages/competition). This is needed to send the winner their claim link. This is always entered manually — even if you used Create Shopify page to build the page itself, the claim-link URL is a separate step and is never pre-filled automatically, so the link you send always points exactly where you intend.3
Notify the winner yourself
HeyComps never contacts entrants directly by email — this step is entirely manual. Click 📋 Manually Send Winner Notification on the competition card — it shows the winner's name and email address first, so you know exactly who you're sending to, followed by a pre-written email template (including their unique claim link) you can copy and send from your own email account.
4
Winner submits their address
The winner clicks their claim link and is shown a form to submit their name, delivery address, and country. Their claim link has no automatic time limit — it stays valid until they submit their address, or until you choose to reject them and select a different winner.
5
Review & approve
Once the winner submits their address, the card shows 📋 View & Approve Winner. Click it to see the winner's full details including a country match indicator. This indicator is advisory only — HeyComps never blocks a submission automatically, so the decision to approve or reject is always yours to make. Then Approve (triggering fulfilment) or Reject (with a reason, triggering automatic re-roll).
Approving guide →
⚠️ Re-roll counter
If you reject a winner, HeyComps automatically selects a new random winner from the remaining entrants and shows a Winner re-roll #N badge on the card. Previously rejected entrants are excluded from every future draw in that competition, so nobody can be picked twice. All rejection reasons are recorded for fair competition auditing, and a ready-to-copy email explaining the decision to the previous winner appears automatically if you'd like to send one. Rejecting resets the notification flow for the new winner back to step 2 above — you'll confirm the URL and send them their own claim link, the same as the first time. If there's nobody left to select, the rejection isn't recorded and the current winner's details remain exactly as they were, so you can still approve and fulfil them if you'd prefer to proceed after all.
Competitions
Approving & fulfilling
After the winner submits their address, you review and approve (or reject) from your My Competitions page.
1
Click "View & Approve Winner"
This button appears on the competition card when the winner has submitted their address. Click it to see a panel showing the winner's full name, email address, delivery address, competition restriction, and a country match indicator (✅ match / ⚠️ mismatch) — shown as a helpful signal, not an automatic block.
2
Approve the winner
Shopify competitions: Click ✅ Approve & Fulfil. HeyComps creates a Shopify order automatically. Fulfil the order in your Shopify Admin as you would any other order.
Manual prize competitions: Click ✅ Approve & Fulfil. No Shopify order is created — you contact the winner using the details shown and deliver the prize yourself. The card shows "Prize approved — please fulfil manually and notify the winner".
The winner's delivery address stays accessible afterwards — a 📍 View delivery address button remains on the card once fulfilled, for both Shopify and Manual prizes, so you can always look it up again later without needing to search your records separately.
Manual prize competitions: Click ✅ Approve & Fulfil. No Shopify order is created — you contact the winner using the details shown and deliver the prize yourself. The card shows "Prize approved — please fulfil manually and notify the winner".
The winner's delivery address stays accessible afterwards — a 📍 View delivery address button remains on the card once fulfilled, for both Shopify and Manual prizes, so you can always look it up again later without needing to search your records separately.
3
Or reject the winner
Click ❌ Reject Winner. Select a reason from the dropdown (Address outside eligible region, Invalid or incomplete address, Unable to verify eligibility, Winner did not respond in time, or Other). Click Confirm Rejection.
HeyComps records the rejection reason against the entry (for fair competition auditing), invalidates the winner's token, and automatically selects a new random winner from the remaining entrants — you'll receive an email with the new winner's name and a link to notify them. A ready-to-copy email for the rejected winner also appears on the card, explaining the decision, in case you'd like to let them know. If there's nobody left to select as a replacement, nothing is rejected — the current winner's details are left untouched so you can still approve them instead.
HeyComps records the rejection reason against the entry (for fair competition auditing), invalidates the winner's token, and automatically selects a new random winner from the remaining entrants — you'll receive an email with the new winner's name and a link to notify them. A ready-to-copy email for the rejected winner also appears on the card, explaining the decision, in case you'd like to let them know. If there's nobody left to select as a replacement, nothing is rejected — the current winner's details are left untouched so you can still approve them instead.
Deals
Build a deal
Deals let visitors reveal a unique Shopify discount code by submitting their email. Go to Deal Builder → + New deal to get started.
1
Add deal details
Enter a deal title, short description, and upload a banner image. The banner appears as the deal hero image on the embed and listing page.
2
Set the discount percentage
Enter the discount percentage for this deal (e.g. 20%). This is the discount applied to the visitor's entire Shopify order when they redeem the code.
3
Set start and end dates
Deals are live between the start and end dates. After the end date, the embed shows an "Expired" state — no new codes can be revealed.
4
Add your T&Cs
Add deal-specific terms and conditions. These appear in the 📋 Deal terms & conditions dropdown on the embed — alongside a link to HeyComps' own T&Cs and Privacy Policy.
5
Set embed branding
Choose theme, accent colour (drives the Reveal button), and font. The same branding options as competitions — see the Deal branding guide.
6
Publish
Click Publish Deal. Your deal goes live immediately. You'll see a confetti celebration and be redirected to My Deals, where your new deal card is ready for the next step.
7
Create your Shopify page
On the deal's card in My Deals, click 🛍️ Create Shopify Page — this creates a blank page on your Shopify store. You'll then build a quick one-time theme template to display the deal on it — see the full walkthrough below.
Full Shopify setup guide →
💡 How codes work
Each visitor who submits their email receives a unique, single-use Shopify discount code. Codes are generated via the Shopify Price Rule API — you don't create them manually. Track all code reveals on the Deal Reveals page.
Deals
Add a deal to your Shopify store
A one-time, ~90 second process per deal. Once you've built the page and its theme template, your deal is live on a real, shareable page that matches your store's branding.
⚠️ Do not delete your store's Header or Footer content at any point. Always build a brand new template for each deal — never add the HeyComps block directly to your Default page template, since that's shared across every page on your site that doesn't have its own template.
A1
Create the page
In My Deals, click 🛍️ Create Shopify Page, confirm or edit the page's URL when prompted, and continue. HeyComps creates a blank page in your Shopify store automatically.
A2
Open the Theme Editor
Click ✏️ Create Deal Shopify Theme Template. This opens your Shopify Theme Editor in a new tab.
A3
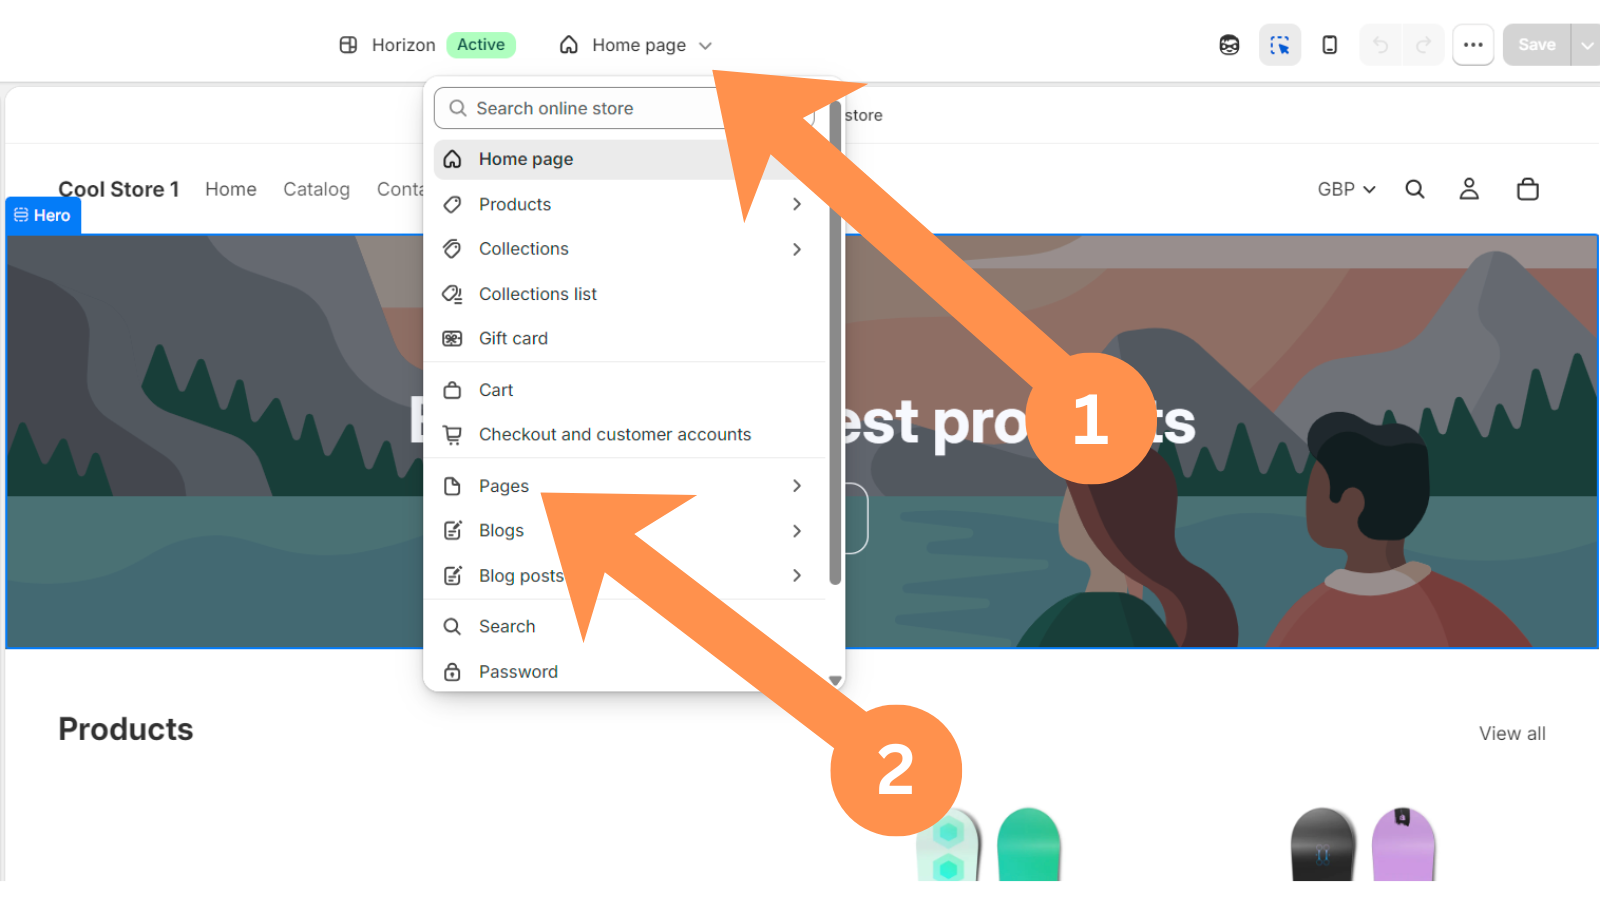
Create a new template
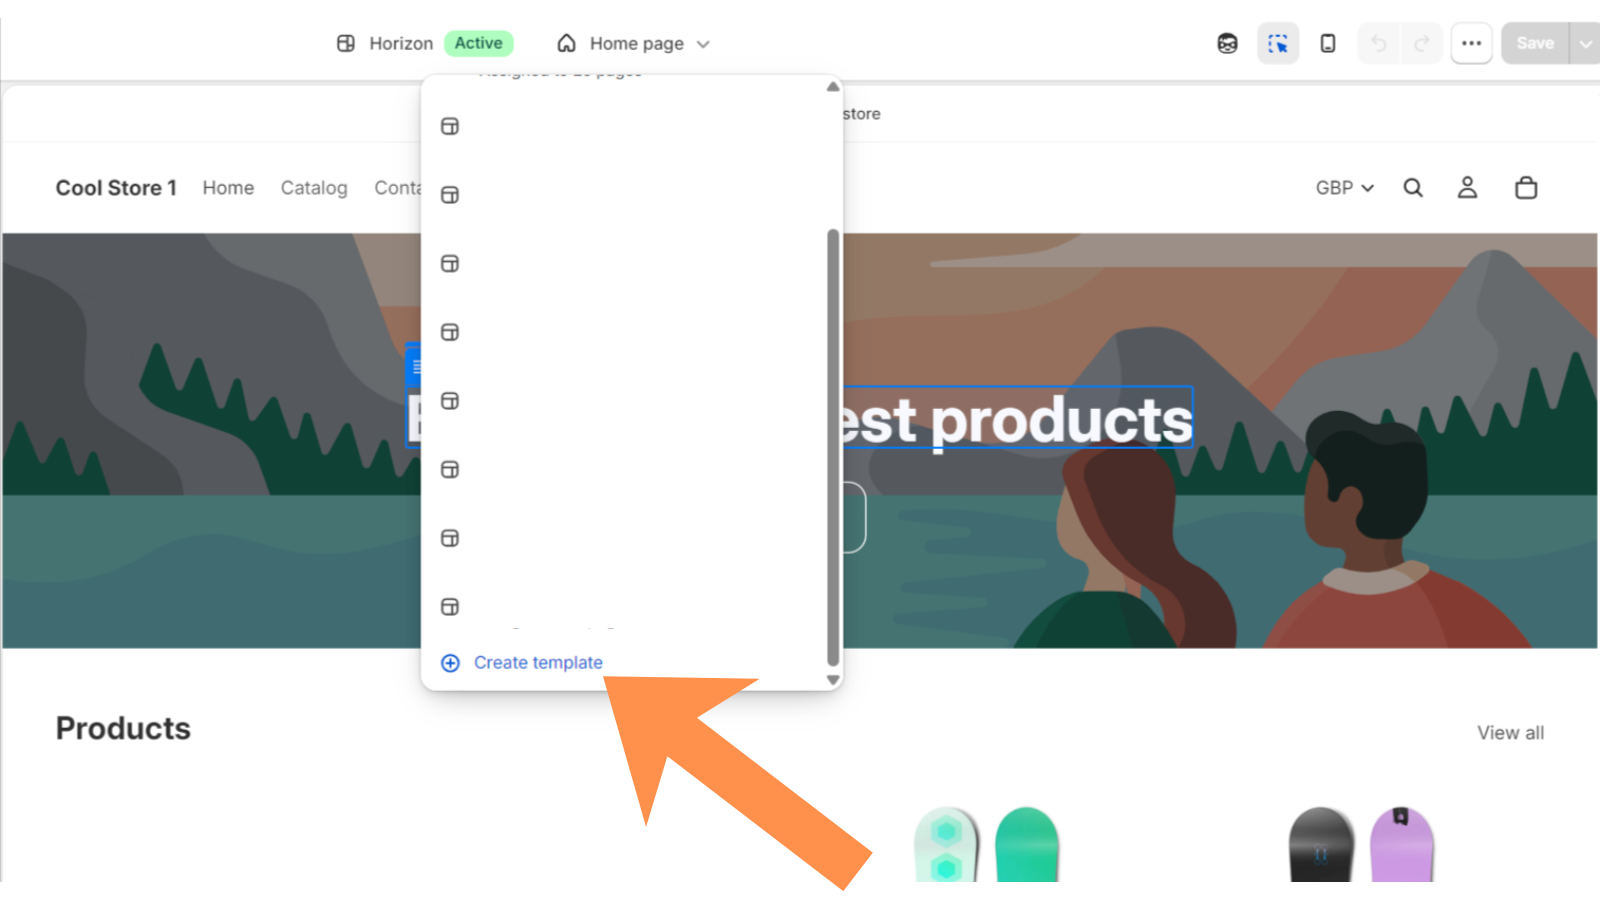
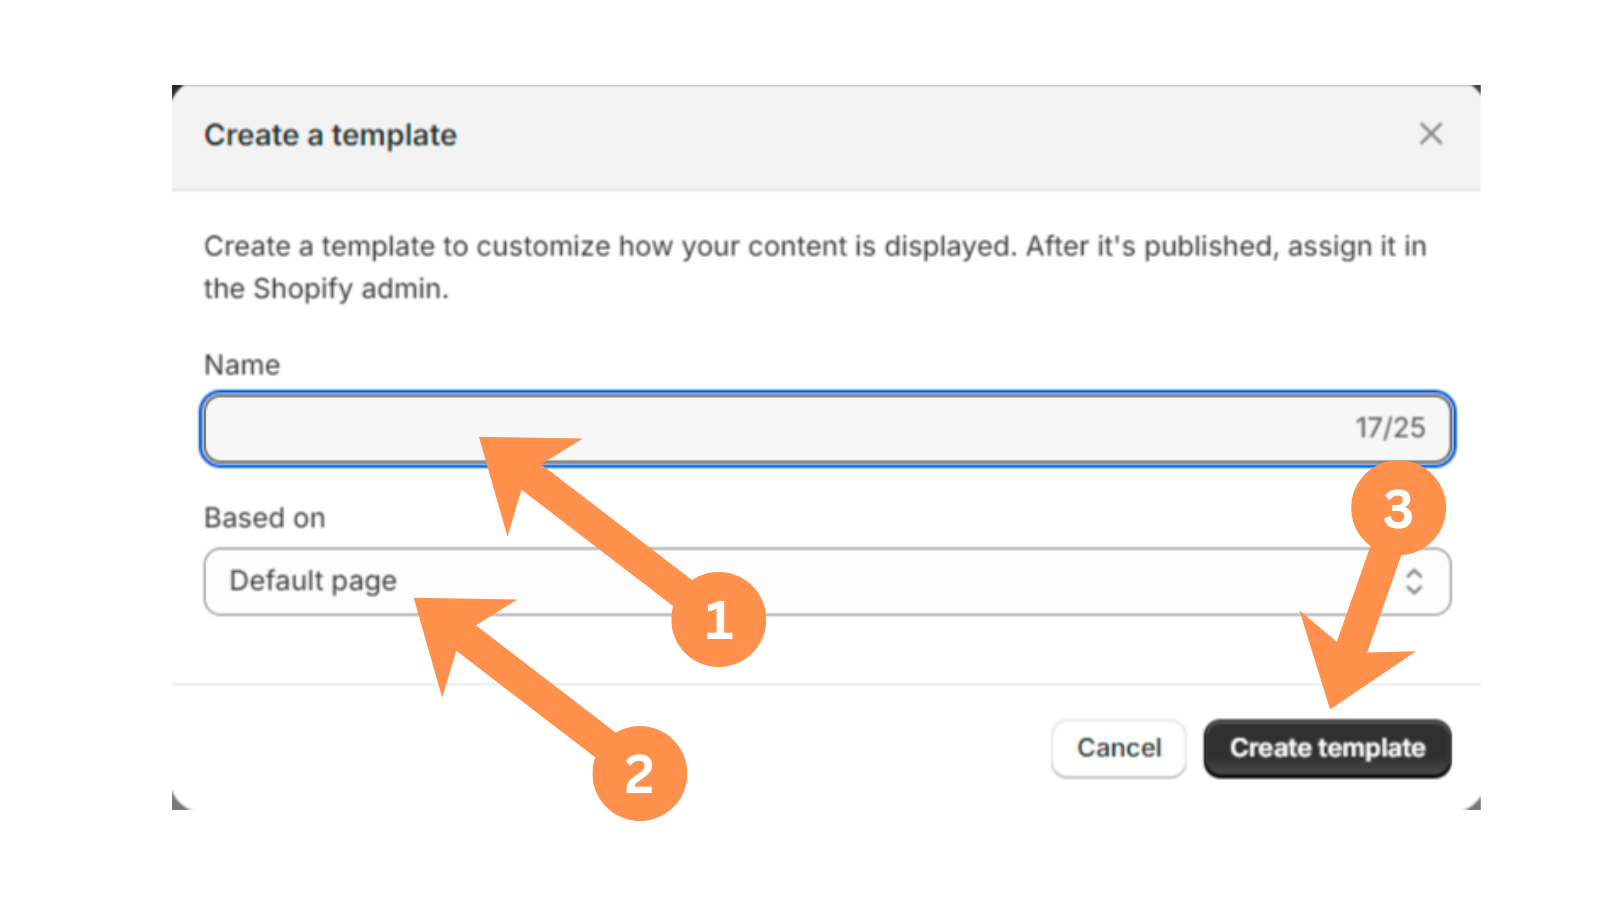
At the top center of the screen, click the template dropdown, select Pages, scroll down and click + Create template. Name it (using the deal's name is a good way to keep track of it), and under Based on, choose Default page.
A4
Clear the inherited content
You'll see existing content already in the template — this is normal, every new template starts as a copy of an existing one. Delete this content, but leave the Header and Footer sections completely alone.
A5
Add the HeyComps block
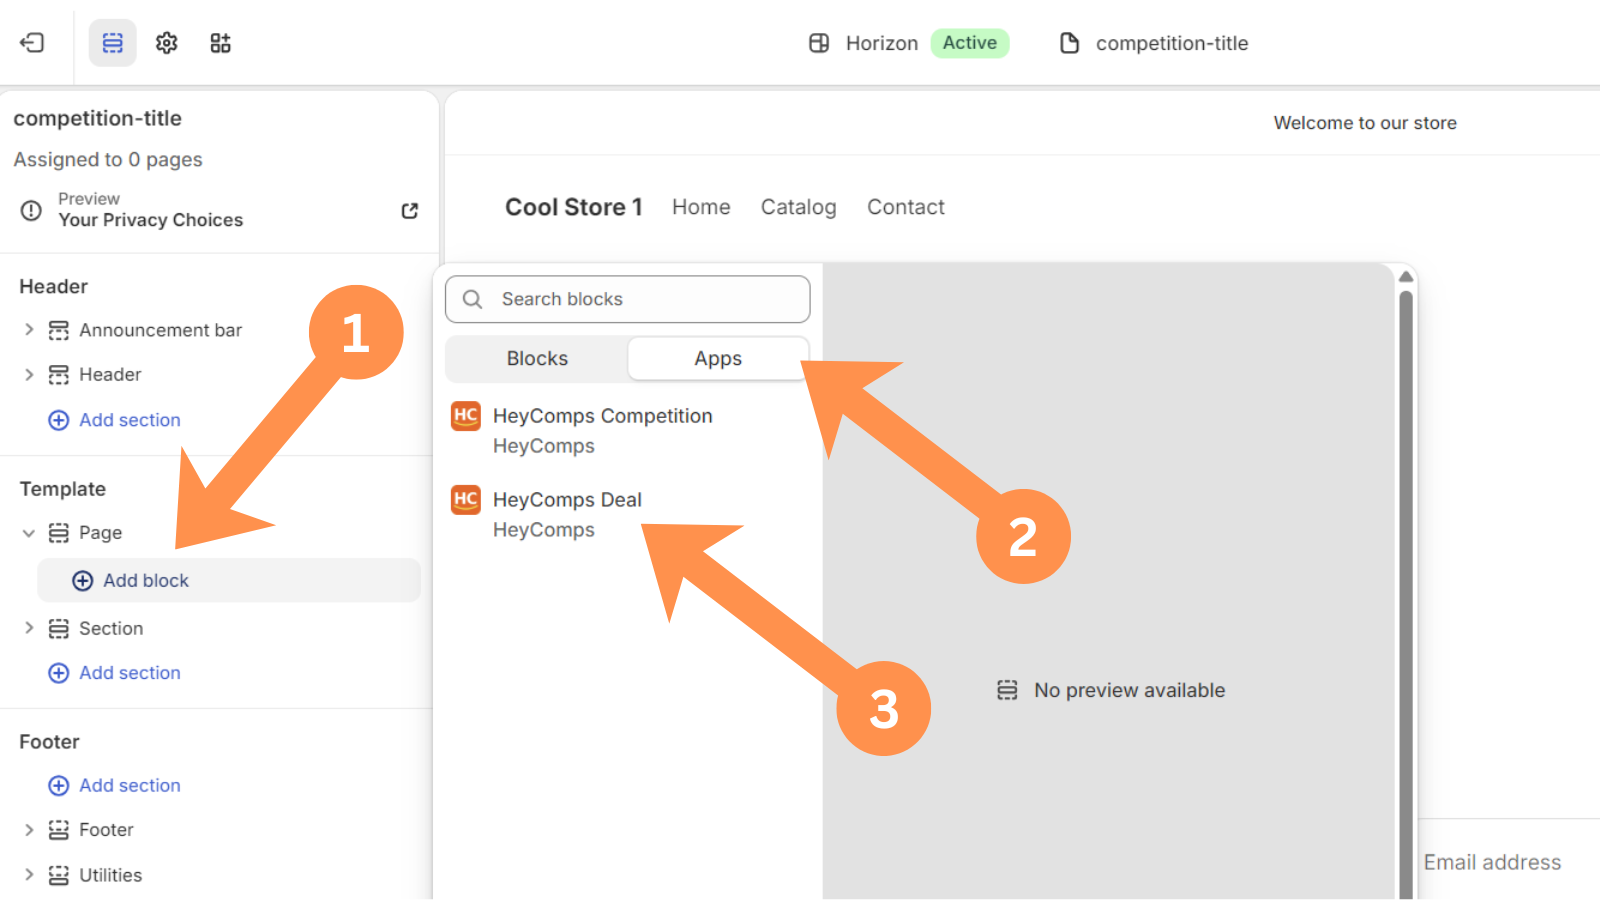
In the left menu, under Template → Page, click Add block → Apps → HeyComps Deal.
A6
Pick your deal and save
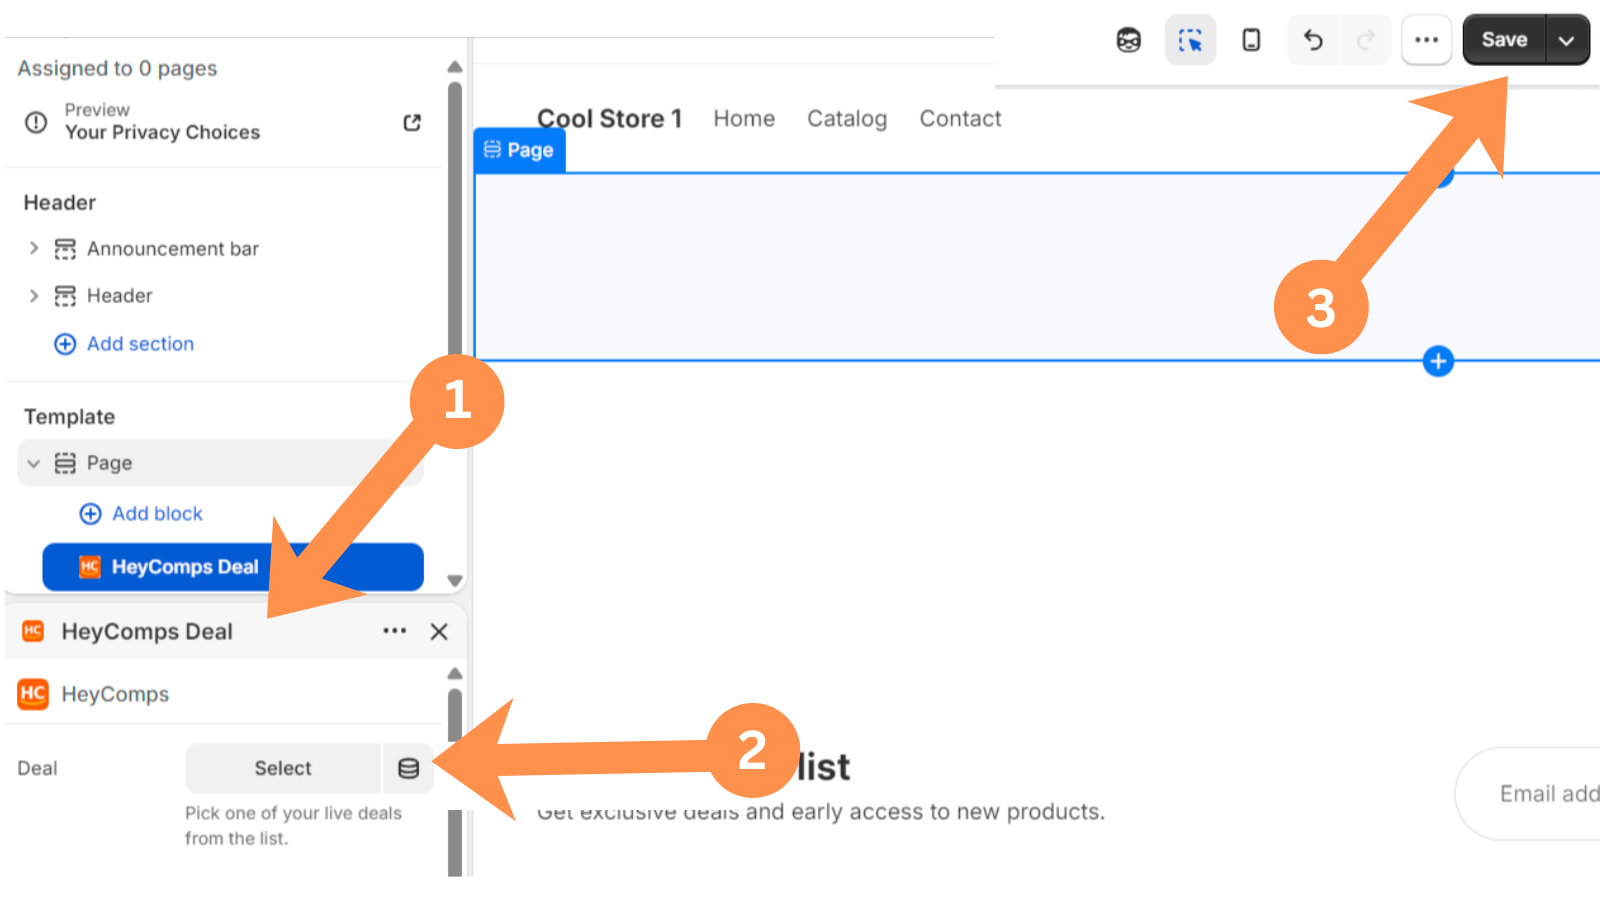
Click the new block, use the Deal dropdown to select this specific deal, then click Save.
A7
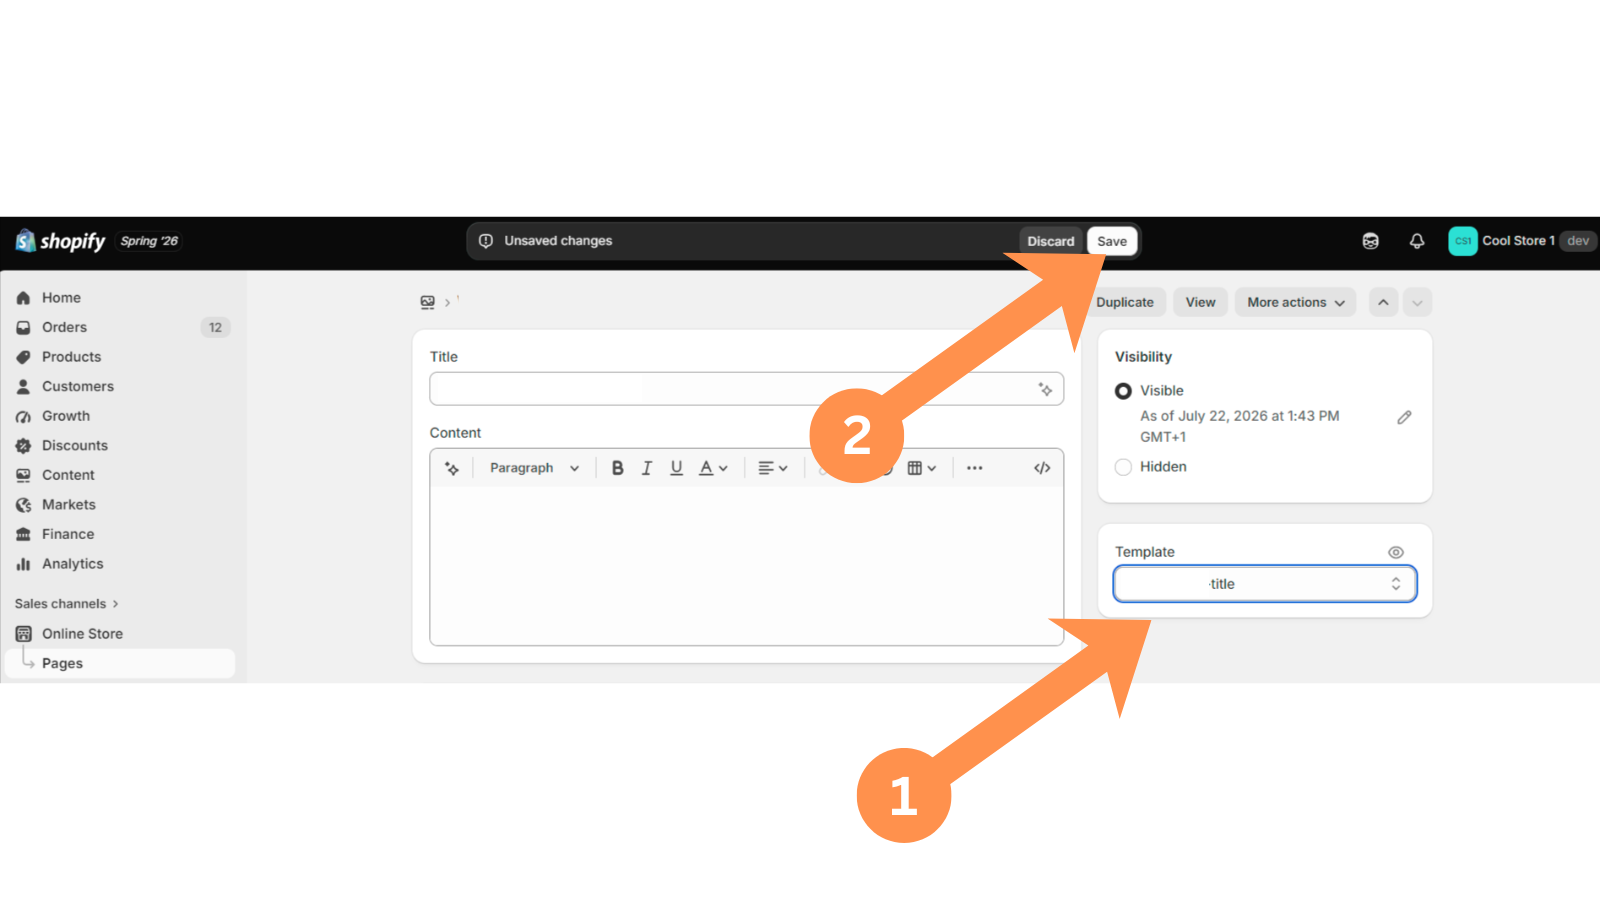
Connect the template to the page
Back in My Deals, click 👁️ View Shopify Page. On that page, click the "..." menu next to Edit Theme, then click Edit Page. Find the Template dropdown on the right, select the template you just built, and click Save.
A8
Confirm it worked
View the live page. It may show just the title with blank space underneath for up to about a minute — this is normal Shopify caching, not an error. Confirm the widget displays full width, correctly branded, and shows the right deal.
Troubleshooting
| What you see | Fix |
|---|---|
| Content shows narrow/centered, not full width | Click the Page section in the sidebar → set Width to Full width |
| A different deal shows on every page | The block was added to Default page instead of your own template — repeat steps A3–A6 with your own dedicated template |
| Still blank after a few minutes | Contact support |
Deals
Deal branding & embedding
The deal embed supports the same branding system as competitions — theme, accent colour, and font — so your deals look native on any Shopify store.
1
Set branding in the Deal Builder
The Embed branding section at the bottom of the Deal Builder has the same controls as the Competition Builder: Theme (Light/Dark), Accent colour (picker + presets), and Font. Settings are saved when you publish and applied to the embed automatically.
2
Publish it to your Shopify store
On your My Deals page, click 🛍️ Create Shopify Page, then follow the theme setup guide to build a real, branded page for it.
Full Shopify setup guide →
Vendor Portal
Analytics & views
Track how your competitions and deals are performing directly from your vendor portal.
👁️ Views
A view is counted each time the competition or deal embed (or standalone listing page) is loaded by a unique browser session. Views are tracked via a sessionStorage deduplication — one view per browser session per competition/deal. Shown on the competition and deal cards in your vendor portal.
📋 Entries (Competitions)
Total entries are shown on each competition card. Click the 📋 Entries button to see the full entries table with entrant name, email, marketing opt-in status, entry source, and entry status. You can filter and view all entries for any competition.
🏷️ Reveals (Deals)
Times used and views are shown on each deal card. The Deal Reveals page shows a full table of every code reveal including email address, timestamp, and code issued.
📊 Conversion rate
You can calculate conversion rate from Views ÷ Entries. A high views-to-entries ratio (e.g. 20%+) typically indicates a compelling prize and a well-placed embed. A low ratio suggests the embed placement or prize value needs attention.
⚠️ Views showing 0?
Views are tracked by the embed and listing page. If your competition or deal isn't embedded on your Shopify store yet, views will be 0 until real visitors land on it. Views from the builder preview don't count.
Vendor Portal
Store profile
Your store profile controls how your brand appears in the vendor portal and on competition and deal cards.
🏪 Shop name
Displayed as your vendor identity throughout the portal and on every competition and deal card.
🖼️ Logo
Your logo appears in the vendor portal sidebar. If no logo is uploaded, a brand-coloured avatar with your initial is shown instead.
🎨 Brand colour
Sets the colour of your vendor avatar in the portal sidebar. This is separate from your embed branding — embed branding is set per competition or deal in the respective builders, though your Store Profile can set defaults for both.
💱 Default prize currency
Only applies to Manual Prize competitions — Shopify Product prizes always use your store's own currency automatically. Leave this on Automatic to default to your store's own currency too, or choose a specific one from the full currency list. You can still pick a different currency for any individual competition in the builder.
Vendor Portal
Entries & reveals
View all competition entries and deal code reveals from your vendor portal.
📋
Competition entries
Go to Entries (or click the Entries button on any competition card). The table shows: entrant name, email address, marketing opt-in (yes/no), entry source, entry date, and status (entered / winner / rejected). Entries are read-only — you cannot edit or delete entries manually.
🏷️
Deal reveals
Go to Deal Reveals. The table shows every code reveal for all your deals: deal title, email address, reveal timestamp, and the unique discount code issued. This gives you a complete record of everyone who has claimed a deal code.
📊
Marketing opt-ins
Competition entries include a marketing opt-in checkbox (if enabled in the builder). Entrants who opt in have consented to receive marketing from your store. You can filter entries to see opt-ins only and export the data for use in your email marketing tool.
Help
Frequently asked questions
Quick answers to the most common questions from HeyComps vendors.
Why isn't my competition or deal showing on my Shopify page?▼
Check the competition or deal is in Live status in your vendor portal. Confirm the HeyComps App Block is added to the correct Shopify page template and the right competition/deal is selected in its dropdown — see the Shopify setup guide. A newly-saved page can also take up to a minute to show content while Shopify's cache catches up — this is normal.
How do I update my embed branding after publishing?▼
Go to My Competitions, find your competition, and click Edit. Update the branding settings in the Embed branding section and save. The branding updates live on your existing Shopify page instantly — no need to touch your Shopify Theme Editor again.
Can I run a Manual Prize competition without a Shopify product?▼
Yes. In the Competition Builder, select 🎁 Manual Prize at the top. The Shopify product selection panel is greyed out — you don't need to select a product. Upload a banner image showing the prize, fill in all other details, and publish. When you approve the winner, you fulfil the prize yourself — HeyComps does not create a Shopify order. Ideal for experiences, holidays, gift cards, or any prize outside your Shopify product range.
What happens if the winner doesn't respond?▼
The winner's claim link has no automatic time limit — it stays valid until they submit their address, so there's no need to worry about it expiring while you wait. If a winner has gone quiet and you'd rather not wait any longer, click View & Approve Winner on the competition card, then click ❌ Reject Winner and select the reason "Winner did not respond in time". HeyComps will automatically select a new random winner from the remaining entrants and notify you by email, along with a ready-to-copy email you can send the original winner explaining the decision.
How does the re-roll work when I reject a winner?▼
When you reject a winner, HeyComps: (1) records your rejection reason against the entry for fair competition auditing, (2) invalidates the current winner's token, (3) selects a new random winner from all remaining "entered" entrants — excluding all previously rejected entries, (4) generates a new claim token, (5) resets the competition card so you can notify the new winner. The re-roll counter on the card shows how many re-rolls have occurred (e.g. "Winner re-roll #2").
How are non-winner discount codes generated?▼
When you publish a competition, HeyComps creates a Shopify Price Rule on your store with your chosen discount percentage and generates the full pool of unique, single-use codes upfront. Each entrant claims one instantly, the moment they enter — nothing is emailed, and there's no wait until the competition closes. Codes are valid for single use only and cannot be combined with other Shopify discount codes by default.
Can I set a worldwide competition?▼
Yes. In the Competition Builder, set the location to Worldwide. There is no country validation when the winner submits their address — the country match indicator will show as "Unable to verify" which is expected for worldwide competitions. You're responsible for ensuring you can deliver the prize to any country.
What does the ⚠️ country mismatch indicator mean?▼
When the winner submits their address, HeyComps compares their submitted country against your competition's location restriction. A ⚠️ mismatch means the submitted country doesn't match your restriction (e.g. competition is UK only but winner submitted a US address). You can still approve if you wish, or reject with the reason "Address outside eligible region" to re-roll to a new winner.
Can I edit a competition after publishing?▼
You can edit the title, description, banner, T&Cs, embed branding, and location scope after publishing. You cannot change the prize product, discount percentage, or dates once the competition is live and has entries, to protect the fairness of the competition. Branding changes take effect immediately on your existing Shopify page — no need to touch your Shopify Theme Editor again.
Can I have both Shopify Product and Manual Prize competitions running at the same time?▼
Yes, you can run as many competitions as you like simultaneously with any mix of prize delivery methods. Each competition is completely independent. The Starter Plan supports up to 5 simultaneous live competitions; Pro and Elite have no limit on simultaneous competitions (entries per billing cycle are capped at 500 on Starter, 10,000 on Pro, and 50,000 on Elite).
Why are my analytics showing 0 views?▼
Views are only counted when real visitors load the competition or deal embed on your Shopify store, or visit the standalone HeyComps listing page. Views from the Competition Builder preview don't count. If you've just published and haven't embedded it on your Shopify store yet, views will be 0 until real traffic visits the embedded page.
How do I cancel my plan?▼
Go to Billing & Plan and click Cancel plan. Your plan remains active until the end of the current billing period. If you cancel during the 14-day free trial, no payment is taken. After cancellation, your competitions and deals will no longer be accessible to visitors but your data is retained for 90 days.
My Shopify product sync isn't working — what should I do?▼
- Go to Products and click ↻ Sync now to force a refresh.
- Check your Shopify store is active and not password-protected.
- Go to Settings and verify your Shopify connection status shows as connected.
- Try disconnecting and reconnecting the HeyComps Shopify app.
- Ensure the products have inventory > 0 — products with zero stock won't appear as prize options.
- If the issue persists, contact HeyComps support.
Do visitors need a HeyComps account to enter a competition or reveal a deal?▼
No. Visitors enter competitions and reveal deals entirely through the embed on your Shopify store — they do not need to create a HeyComps account. Entry requires only an email address (and optionally a name and marketing opt-in). Deal reveals require an email address. Everything happens seamlessly on your Shopify page.
Can I use a custom font on my embed that matches my Shopify theme?▼
The best option for matching your Shopify theme font is to select System / Shopify native in the font selector. This uses the system font stack (system-ui, -apple-system, etc.) which closely matches what most Shopify themes use. You can also choose Inter, Poppins, Nunito, or DM Sans if those match your brand. Font selection is in the Embed branding section of the Competition or Deal Builder.
Help
Contact support
Can't find the answer you need? The HeyComps team is here to help.